目录
pprof 分析
采集与分析
如果要在浏览器中查看可视化界面,需要安装 graphviz,mac 安装方式为 brew install graphviz。收集 metrics 的指标命令如下。
curl http://localhost:6060/debug/pprof/profile\?seconds\=30 -o cpu_profile
curl http://localhost:6060/debug/pprof/heap -o heap
curl http://localhost:6060/debug/pprof/goroutine\?debug\=1 -o goroutinedebug1
收集指标时,可添加 seconds 参数,此参数不同 profile 有不同的含义:1)对于 allocs, block, goroutine, heap, mutex, threadcreate 返回的是指定时间段的增量 profile(因为是 delta 所以有可能是负数,针对内存泄漏或者 goroutine 泄漏,这种方式更容易发现问题);2)对于 cpu (profile), trace 是指采集固定的时间段。
参考官方文档 https://pkg.go.dev/net/http/pprof#hdr-Parameters,参数具体含义如下:
- debug=N (all profiles): response format: N = 0: binary (default), N > 0: plaintext
- gc=N (heap profile): N > 0: run a garbage collection cycle before profiling
- seconds=N (allocs, block, goroutine, heap, mutex, threadcreate profiles): return a delta profile
- seconds=N (cpu (profile), trace profiles): profile for the given duration
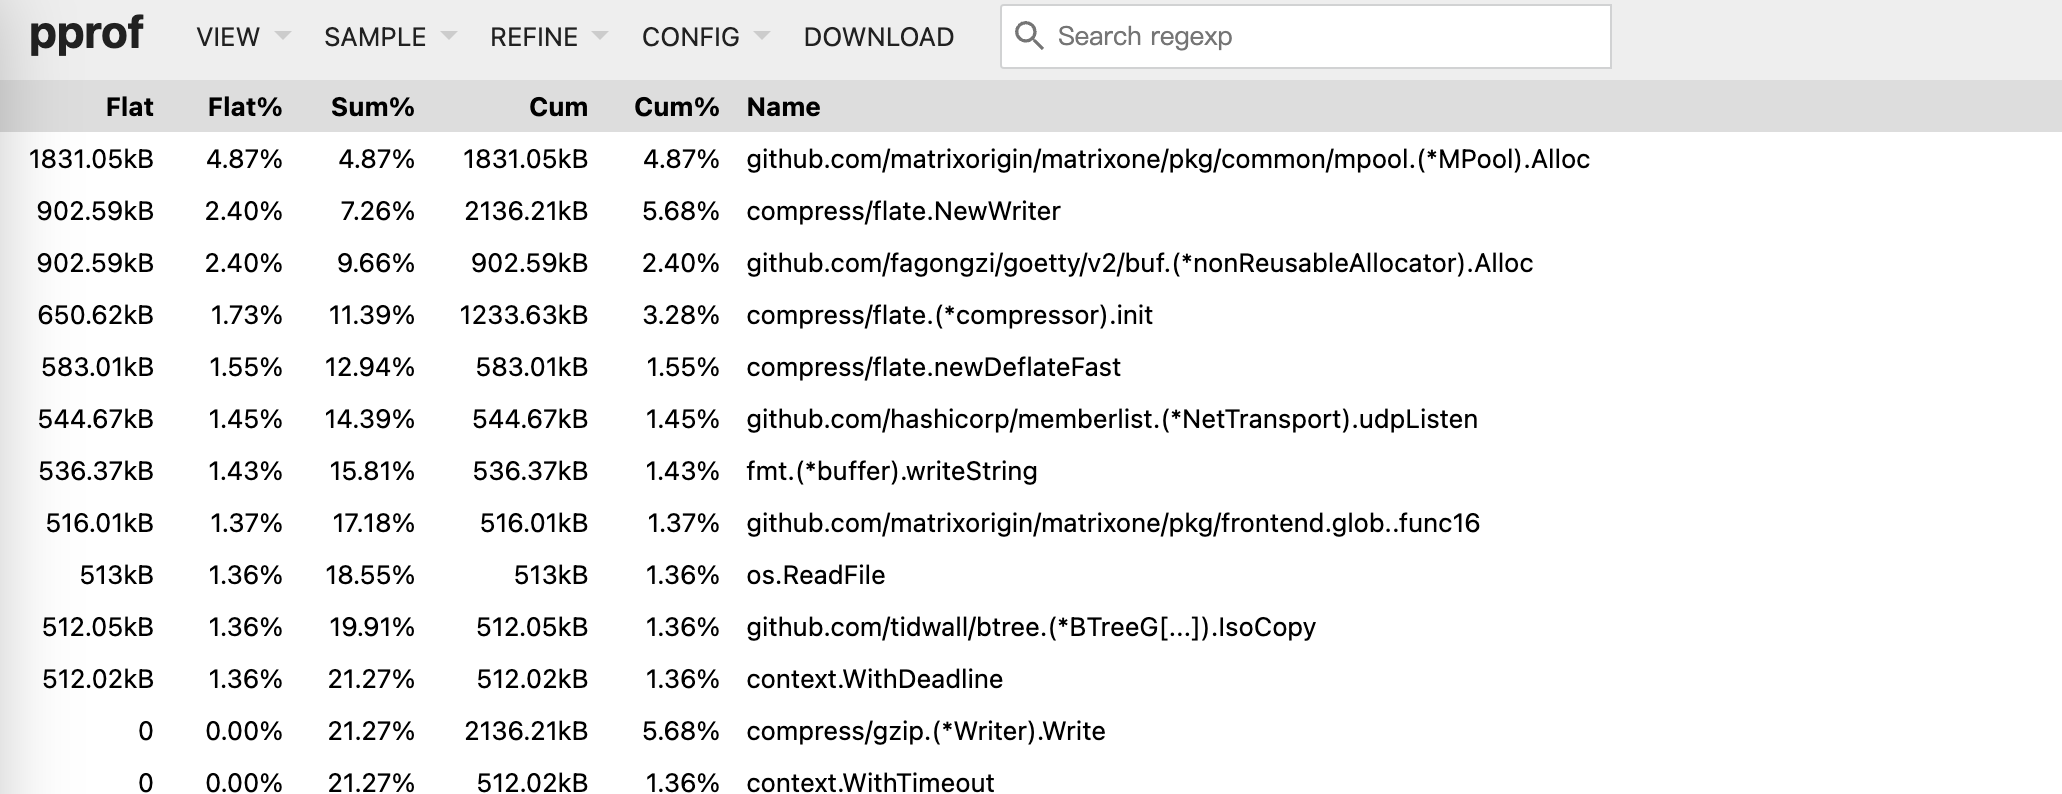
在查看 goroutine 时,如果不加 debug 参数,返回的 binary 形式的结果,可以使用 go tool pprof 分析,如果是 debug=1 则是概述性的分析(如果 goroutine stack 相同则会合并),如果是 debug=2 会单独打印每个 goroutine 的 stack。以 heap 为例,解释下 pprof 输出数据中每列的含义。
| 列 | 描述 |
|---|---|
| Flat, Flat% | 在采样周期中,正在运行的函数所消耗的资源(比如第一行是 Alloc 函数自身消耗了 1831kB),正在运行的函数消耗资源所占总资源的比例。这里的”正在运行”指的是本函数正在 Running,而不是本函数调用的子函数。可以区别 Cum,Cum 涵盖了本函数以及本函数调用的子函数。 |
| Sum% | 累积的百分比,是从第一行到当前行,所有 Flat% 的和。 |
| Cum, Cum% | 采样周期中,函数所消耗的资源,包括了两种情况:1)当前函数,2)当前函数正在调用的子函数。查看 top 时,有时候观察到 Flat 和 Flat% 都是 0,但是 Cum 不为 0,应该就是第二种 case。 |
下图是 heap profile 的 top 输出

查看 profile 时,可以使用 -http=:8081 在本地启动一个 profile web 服务器,此时可以在浏览器页面查看 profile 信息,浏览器中的信息较为丰富,比如可以查看火焰图。
go tool pprof -http=:8081 ./profile
go tool pprof -http=:8081 ./heap
go tool pprof -http=:8081 ./main ./goroutinedebug1
go tool pprof -http=:8081 http://localhost:6060/debug/pprof/goroutine -o goroutines

在 K8s 集群中,如果我们将 pod 的端口 forward 到了本地,使用 kubectl port-forward pod/podname -n namespace 命令,也可以直接使用浏览器查看 pod 的 profile(通过 url: http://localhost:8082/debug/pprof/goroutine?debug=2),直接在浏览器查看时,不能将 debug 参数设置为 0,goroutine 比较多时,可以通过关键词 minutes 或者应用程序中的关键字进行搜索。
采集 block 和 mutex 的命令如下,这两个 profile 只有在代码中添加了代码 runtime.SetBlockProfileRate 和 runtime.SetMutexProfileFraction 才起作用,否则采样是空的。
go tool pprof http://localhost:6060/debug/pprof/block
go tool pprof http://localhost:6060/debug/pprof/mutex
在采样 profile 时,有时会遇到错误 Could not enable CPU profiling: cpu profiling already in use,这是因为有另一个程序已经在采样了,比如同时运行两个 curl http://localhost:6060/debug/pprof/profile -o cpu_profile 就会报这个错误。
pyroscope 持续分析
pyroscope 是 grafana 推出的持续性能分析工具,可部署在 dev 环境(甚至 prod 环境)用于持续采集应用 profile 数据。其优点在于持续采集,而不是发生 oom 或者其他性能问题的时候才去采集,这样在分析历史性能问题的时候比较有用,比如 pod 已经被干掉了。
pyroscope 另一个大优势是提供了界面非常友好的 UI,能直观展现程序的 profile 数据。 可参考官方文档 Use the Pyroscope UI to explore profiling data,在其提供的 proscope ui 中有四种界面:
- Tag Explorer: 这个界面主要是灵活,让用户自己基于 tag 来选择应用进行分析,跟 grafana 中的 explore 界面是一样的。
- Single View: 这个界面用来对单一 profile 进行垂直深入分析,有两种数据格式:表格和火焰图,跟 pprof 中的火焰图类似,可单击某个函数查看详情(调用关系等)。
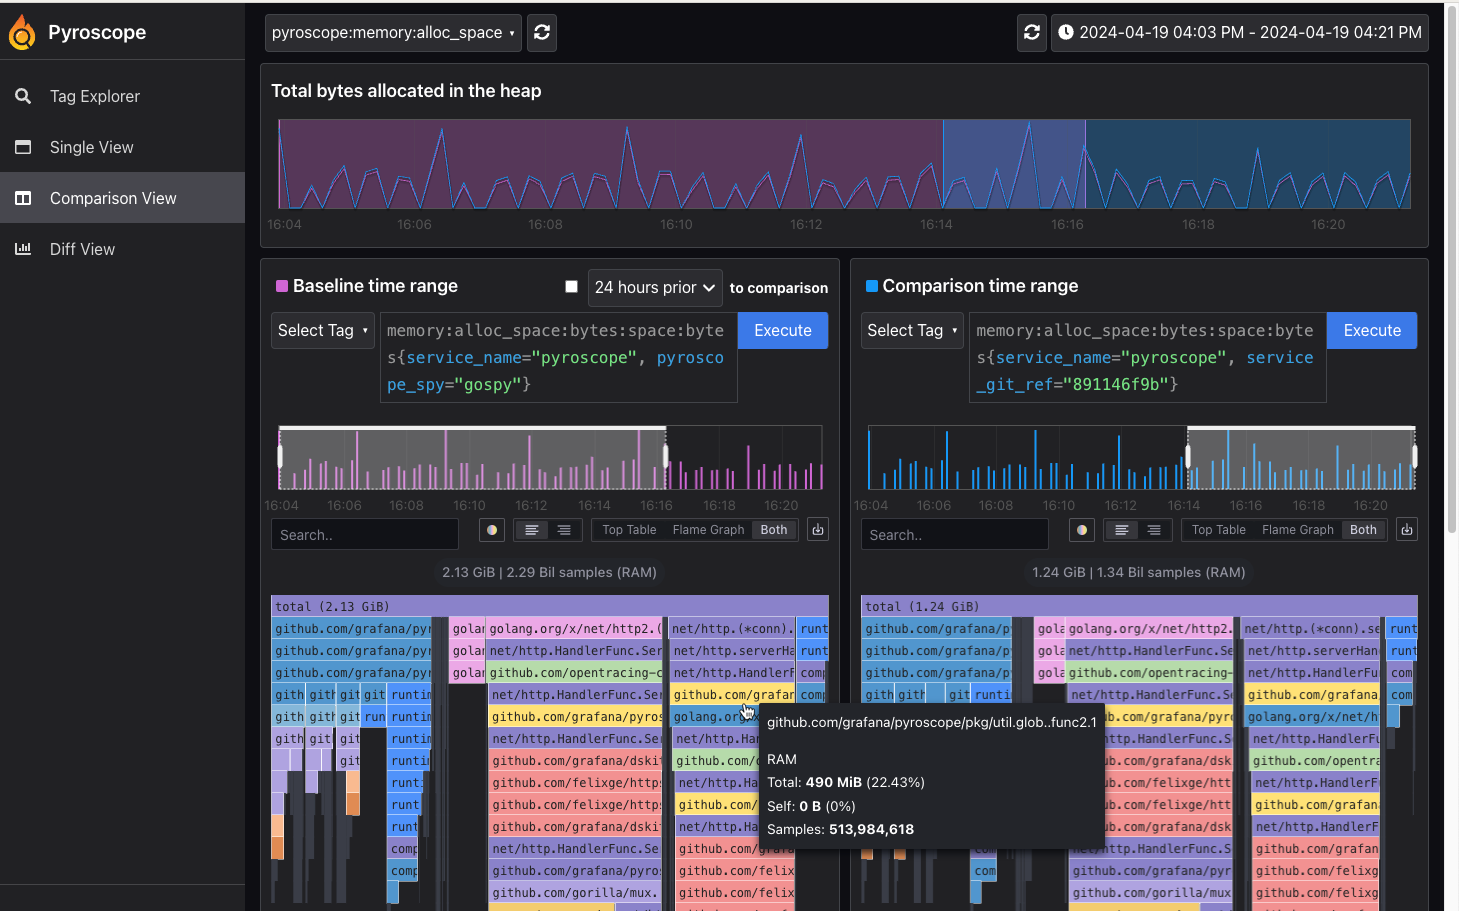
- Comparison View: 将界面一分为二,可基于 label、时间等,对应用性能数据进行对比。
- Diff View: 这个跟 Comparison View 类似,不是是两个界面数据的比值(从而是百分比),而不是具体数值,这个视图能直观显示变化:增加还是减少,具体是多少比例等,可参考文档中提供的图:diff page。
下图是 pyroscope 提供的对比视图 Comparison View,对比同一个应用程序在不同时间的内存使用情况。目前在我们的项目中,pyroscope 已经是一个不可或缺的工具。

trace
pprof 是基于采样来记录程序性能数据的,而 trace 是基于事件来记录程序运行情况,事件比如:系统调用、gc等。相对于 pprof,trace 能记录更详细的数据,同样采集 trace 有更大的性能损失。总体来说 trace 在分析下面三个问题时比较有用:
- 并行执行程度不足的问题:没有充分利用多核资源,比如有闲置 processer(GPM 中的 P),或者有大量 goroutine 是 Runnable 状态(可运行但是未调度),系统调度压力太大。
- 因 GC 导致的延迟较大的问题。
- goroutine 执行情况分析,尝试发现 goroutine 因各种阻塞(锁竞争、系统调用、调度、辅助 GC )而导致的有效运行时间较短或延迟的问题。
trace 采集与分析
采集 trace 可通过在代码中引入 package _ "net/http/pprof" 实现(或者在代码中通过 trace.Start(os.Writer) 来将 trace 数据写入一个 writer 中)。
curl http://127.0.0.1:8080/debug/pprof/trace -o trace.out
运行 go tool trace ./trace.out命令之后,会打开一个 web 页面,页面中的 Goroutine analysis 链接可以分析各个 goroutine 阻塞在一些事件上的时间。

trace 的介绍参考官方文档《Go Execution Tracer》。
trace 示例
对于 trace 《通过实例理解Go Execution Tracer》有比较清晰的说明。这个文档中也介绍了一个例子来演示 trace 分析问题步骤。程序代码如下。
// main.go
package main

import (
    "image"
    "image/color"
    "image/png"
    "log"
    "os"
    "runtime/trace"
)

const (
    output     = "out.png"
    width      = 2048
    height     = 2048
    numWorkers = 8
)

func main() {
    trace.Start(os.Stdout)
    defer trace.Stop()

    f, err := os.Create(output)
    if err != nil {
        log.Fatal(err)
    }

    img := createSeq(width, height)

    if err = png.Encode(f, img); err != nil {
        log.Fatal(err)
    }
}

// createSeq fills one pixel at a time.
func createSeq(width, height int) image.Image {
    m := image.NewGray(image.Rect(0, 0, width, height))
    for i := 0; i < width; i++ {
        for j := 0; j < height; j++ {
            m.Set(i, j, pixel(i, j, width, height))
        }
    }
    return m
}

// pixel returns the color of a Mandelbrot fractal at the given point.
func pixel(i, j, width, height int) color.Color {
    // Play with this constant to increase the complexity of the fractal.
    // In the justforfunc.com video this was set to 4.
    const complexity = 1024

    xi := norm(i, width, -1.0, 2)
    yi := norm(j, height, -1, 1)

    const maxI = 1000
    x, y := 0., 0.

    for i := 0; (x*x+y*y < complexity) && i < maxI; i++ {
        x, y = x*x-y*y+xi, 2*x*y+yi
    }

    return color.Gray{uint8(x)}
}

func norm(x, total int, min, max float64) float64 {
    return (max-min)*float64(x)/float64(total) - max
}
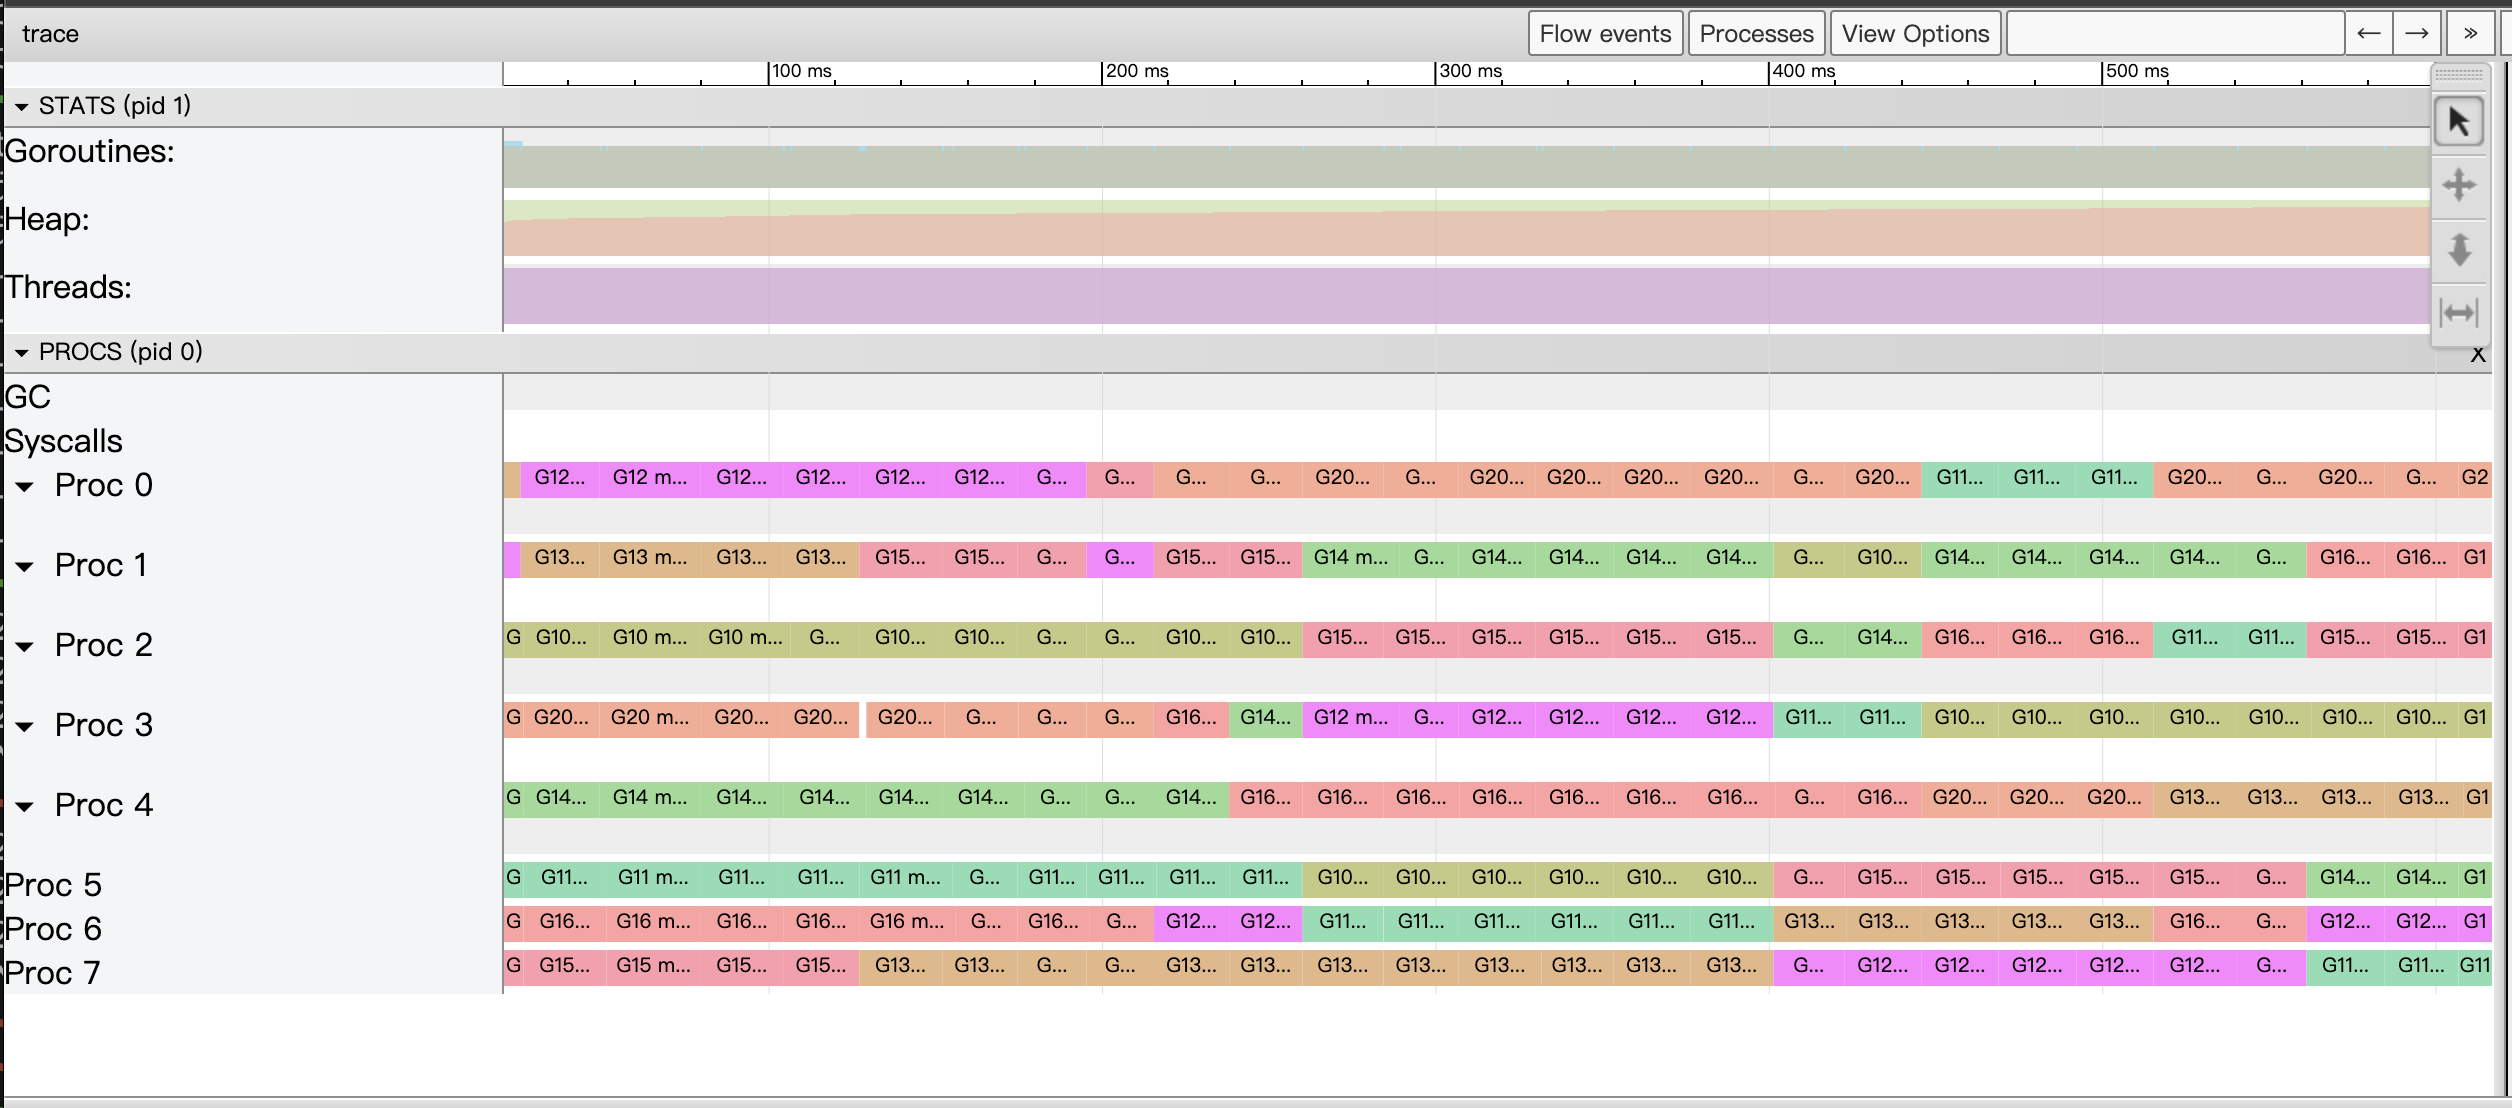
原作者通过几步优化来展示分析过程:1.第一版即上面代码,在未启用并发的情况下,整个应用程序只有两个 goroutine 在运行,显然有空闲的 processor; 2.在第二版优化中,每个 pixel 都放到了单独的 goroutine 中去执行,这样创建了大量的 goroutine,但是 processer 的数量是有限的,总是在切换上下文,大量 goroutine 都是 Runnable 状态,得不到 process 执行。3.在后面的优化中,作者通过一个 worker goroutine 池的方式来启动固定数量的 goroutine,并优化了并行方式来减少阻塞,最终得到了如下完美的运行图。

GOMEMLIMIT 环境变量
GOMEMLIMIT 环境变量设置 go 运行时内存使用上限,debug 包里面的 runtime/debug.SetMemoryLimit 可以动态的配置这个值。配置了这个值以后,在内存快达到此上限后会触发 GC,即使设置环境变量 GOGC=off,这个配置的默认值是 math.MaxInt64。通过配置这个内存上限,使内存达到上限时发生 GC,能缓解程序 OOM 的问题。
《等等, 怎么使用 SetMemoryLimit?》 根据配置的 SetMemoryLimit 大小以及 GOGC 开关分为了四种情况:
- SetMemoryLimit 足够大,GOGC=off:因为 MemoryLimit 足够大,程序的内存使用很难达到这个上限,又把 GC 关掉了,所以这种情况不会触发 GC。
- SetMemoryLimit 不够大,GOGC=off:MemoryLimit 不够大,程序内存使用频繁达到这个上限,所以也会频繁发生 GC。
- SetMemoryLimit 足够大,GOGC=100:这种情况下,基本是正常的 GC 逻辑,运行时会在新申请的内存跟活跃内存一样大时,触发 GC(GOGC=100 配置的效果,其中活跃内存是上次 GC 之后未回收的内存)。因为 MemoryLimit 足够大,所以 GC 基本是通过 GOGC=100 触发的。
- SetMemoryLimit 不够大,GOGC=100:这种情况下,两个配置都可能会触发 GC。
通过环境变量 GODEBUG=gctrace=1 可以打印 GC 日志。
automaxprocs 自动配置 GOMAXPROCS
在 K8s 环境下,我们会给 pod 设置 cpu limit,比如 1 核,在默认情况下,pod 中的进程通过 /proc 文件系统看到的是宿主机的资源情况,也就在通过 runtime.GOMAXPROCS(maxProcs) 设置 Go 调度器中的 P(逻辑 processor) 时,会设置成主机的核数。P 过大会带来频繁、不必要的上下文切换,因此会影响程序性能。
项目 https://github.com/uber-go/automaxprocs 会根据 pod 的 limit 自动配置 max procs。其工作原理就是读取 /proc/self/cgroup 以及 /proc/self/mountinfo 文件,找到当前 Pod 所在的 cgroup,主要是 cpu 子系统,并读取 cpu 的 quota 的配置(cpu 使用上限,包括cpu.cfs_quota_us 以及 cpu.cfs_period_us),并向下取整。
使用方式是直接在 main 文件中,引入 package 就可以了,会在 init 函数中自动配置。
import _ "go.uber.org/automaxprocs"

func main() {
  // Your application logic here.
}
另外需要注意的是,golang 的 GOMAXPROCS 是可以运行时动态调整的。
参考
官方文档 https://pkg.go.dev/net/http/pprof
官方一篇文章 Profiling Go Programs
一个不错的 go pprof 介绍 https://github.com/DataDog/go-profiler-notes
《瞬间高并发,goroutine执行结束后的资源占用问题》 提出了一个现象,就是流量洪峰过后,Go 的一些运行时内存并不会释放,比如 G 结构体,导致 cpu 和 内存并不会回落到洪峰前的水位。
GOMEMLIMIT is a game changer for high-memory applications